Change devices
At this point we have a full conferencing application with audio and video and mute buttons. However, it lacks of an important feature. We cannot change the microphone and camera device selection.
During this lesson we will add a new button to the toolbar that will open a panel to allow users to change the microphone and camera.
You can download the starter code from Step.05-Exercise-Change-devices.
Filter media devices
The first thing that we will implement is a function to retrieve the selected microphone, camera and speaker.
To choose each device we get the deviceId from the localStorage. If the
deviceId isn't available or if it isn't connected to the computer, we will
choose the first device that is available.
Define localStorage keys
First of all, we will define an enum with the keys to save the selected device
in the localStorage. We define this values in the file
./client/src/types/LocalStorageKey.ts.
const prefix = 'vpaas-tutorial';

export enum LocalStorageKey {
  VideoInputKey = `${prefix}:videoInput`,
  AudioInputKey = `${prefix}:audioInput`,
  AudioOutputKey = `${prefix}:audioOutput`,
}
Create function to filter
Once we have defined the keys, we will define the function that to retrieve the
values from the localStorage. Let's start by creating the file
./client/src/filter-media-devices.ts.
import {LocalStorageKey} from './types/LocalStorageKey';
We start by defining the interface DevicesInfo that defines the structure of
the returning value for our function:
interface DevicesInfo {
  videoInput: MediaDeviceInfo | undefined;
  audioInput: MediaDeviceInfo | undefined;
  audioOutput: MediaDeviceInfo | undefined;
}
Now we define the filterMediaDevices function that will receive a list of all
available devices and return a value with the structure that we have just
defined:
export const filterMediaDevices = async (devices: MediaDeviceInfo[]): Promise<DevicesInfo> => {
Inside the function, we start by recovering the deviceId from the
localStorage for the microphone, camera and speaker.
const videoInputId = localStorage.getItem(LocalStorageKey.VideoInputKey);
const audioInputId = localStorage.getItem(LocalStorageKey.AudioInputKey);
const audioOutputId = localStorage.getItem(LocalStorageKey.AudioOutputKey);
Now we try to recover the MediaDeviceInfo for each device:
let videoInput = devices.find(device => device.deviceId === videoInputId);
let audioInput = devices.find(device => device.deviceId === audioInputId);
let audioOutput = devices.find(device => device.deviceId === audioOutputId);
This value could be undefined due to two reasons:
- There isn't any
deviceIdsaved in thelocalStorage. - The
deviceIdthat is saved in thelocalStorageis not available at this moment.
In case we don't have device for any of this types, we select the first
devices of that type.
if (videoInput == null) {
  videoInput = devices.find(device => device.kind === 'videoinput');
}

if (audioInput == null) {
  audioInput = devices.find(device => device.kind === 'audioinput');
}

if (audioOutput == null) {
  audioOutput = devices.find(device => device.kind === 'audiooutput');
}
Finally, we return the information for each device:
return {
  videoInput,
  audioInput,
  audioOutput,
};
Settings component
The Settings component will display a dialog to choose the devices. Open the
file ./client/src/Meeting/Settings/Settings.tsx and start editing it.
Our first step is to import all the dependencies:
import {useEffect, useState} from 'react';
import {Bar, Button, Modal} from '@pexip/components';
import {DevicesSelection, Selfview} from '@pexip/media-components';
import {type MediaDeviceInfoLike} from '@pexip/media-control';
import {LocalStorageKey} from '../../types/LocalStorageKey';
import {filterMediaDevices} from '../../filter-media-devices';
Then we will define the properties for our component. In this case we will define three parameters:
- isOpen: This
booleanparameter indicates if the settings dialog should be visible or not. - onCancel: Callback function that is triggered if the user closes the dialog without saving.
- onSave: Callback function that is triggered when the user save the current settings.
interface SettingsProps {
  isOpen: boolean;
  onCancel: () => void;
  onSave: () => void;
}
And we pass this properties to the Settings functional component:
export const Settings = (props: SettingsProps): JSX.Element => {
Define states
Inside the functional component we will define some constants to save the states:
- localStream:
MediaStreamto display the user feedback of the chosen camera. - devices: Array with the info of all available devices.
- videoInput: Information of the selected camera.
- audioInput: Information of the selected microphone.
- audioOuput: Information of the selected speaker.
const [localStream, setLocalStream] = useState<MediaStream>();

const [devices, setDevices] = useState<MediaDeviceInfoLike[]>([]);

const [videoInput, setVideoInput] = useState<MediaDeviceInfoLike>();
const [audioInput, setAudioInput] = useState<MediaDeviceInfoLike>();
const [audioOutput, setAudioOutput] = useState<MediaDeviceInfoLike>();
Handlers for buttons
Once we have established all the states, we will start defining the functions that will be triggered by clicking on the buttons.
When the user clicks on the cancel button, the app will stop all the
MediaStreamTrack and call the onCancel() callback.
const handleCancel = (): void => {
  localStream?.getTracks().forEach(track => {
    track.stop();
  });
  props.onCancel();
};
If the user clicks on the save button, the app click save the settings in the
localStorage, stops the MediaStreamTrack and calls the onSave() callback.
const handleSave = (): void => {
  localStorage.setItem(
    LocalStorageKey.VideoInputKey,
    videoInput?.deviceId ?? '',
  );
  localStorage.setItem(
    LocalStorageKey.AudioInputKey,
    audioInput?.deviceId ?? '',
  );
  localStorage.setItem(
    LocalStorageKey.AudioOutputKey,
    audioOutput?.deviceId ?? '',
  );
  localStream?.getTracks().forEach(track => {
    track.stop();
  });
  props.onSave();
};
useEffect hook
We will use the useEffect hook to request the video each time that the dialog
is displayed.
To simplify the process, we define a function to request the video:
const requestVideo = async (): Promise<void> => {
  const devices = await navigator.mediaDevices.enumerateDevices();
  setDevices(devices);

  const filteredDevices = await filterMediaDevices(devices);

  setVideoInput(filteredDevices.videoInput);
  setAudioInput(filteredDevices.audioInput);
  setAudioOutput(filteredDevices.audioOutput);

  const localStream = await navigator.mediaDevices.getUserMedia({
    video: {
      deviceId: videoInput?.deviceId,
    },
  });
  setLocalStream(localStream);
};
And then we define the hook to trigger requestVideo each time props.isOpen
changes to true:
useEffect(() => {
  if (props.isOpen) {
    requestVideo().catch(e => {
      console.error(e);
    });
  }
}, [props.isOpen]);
Render the component
Finally, we render the component.
return (
  <Modal isOpen={props.isOpen} className="Settings" onClose={handleCancel}>
    <h3>Settings</h3>
    ...
  </Modal>
)
Now we will start defining some components inside our modal:
<Selfview
  isVideoInputMuted={false}
  shouldShowUserAvatar={false}
  username='Video'
  localMediaStream={localStream}
  isMirrored={true}
/>
The next element that we will declare will contain the Select HTML elements
for choosing the microphone, camera and speakers.
The speaker is only available in devices that support the sinkId property.
<DevicesSelection
  devices={devices}
  videoInputError={{
    title: '',
    description: undefined,
    deniedDevice: undefined
  }}
  audioInputError={{
    title: '',
    description: undefined,
    deniedDevice: undefined
  }}
  videoInput={videoInput}
  audioInput={audioInput}
  audioOutput={audioOutput}
  onVideoInputChange={setVideoInput}
  onAudioInputChange={setAudioInput}
  onAudioOutputChange={setAudioOutput}
  setShowHelpVideo={() => {}}
/>
Finally, we render the buttons that the user will use to cancel (close the dialog without saving it) and save the current configuration.
<Bar className="ButtonBar">
  <Button onClick={handleCancel} modifier="fullWidth" variant="tertiary">
    Cancel
  </Button>
  <Button title="Save" onClick={handleSave} modifier="fullWidth">
    Save
  </Button>
</Bar>
Participant component
We will make a small modifications to the file
./client/src/Meeting/Participant/Participant.tsx. We will include the sinkId
in the ParticipantProps and pass it to the audio HTML element.
The sinkId is a property used in Web APIs, specifically in the HTMLMediaElement
interface. It represents the ID of the audio output device (such as a speaker or
headphones) that the audio from a HTMLMediaElement (like an <audio> or
<video> element) should be played on. In these tutorials this ID is referred
as deviceId.
First, we define the new property:
interface ParticipantProps {
  participantId: string;
  md: Cells | undefined;
  audioStream: MediaStream | null;
  videoStream: MediaStream | null;
  sinkId: string;
}
And, after that, we will assign the sinkId to the Audio element:
  {props.audioStream != null && (
    <Audio
      srcObject={props.audioStream}
      autoPlay={true}
      sinkId={props.sinkId}
    />
  )}
Therefore, wi this small modification, each time the sinkId changes we will
hear the audio in a different speaker.
RemoteParticipants component
In order to pass the sinkId to the Participant component, we will need to
modify also the RemoteParticipant. Open the file
./client/src/Meeting/RemoteParticipants/RemoteParticipants.tsx and make a
similar changes.
Define the new property:
interface RemoteParticipantsProps {
  remoteParticipantsIds: string[];
  streamsInfo: StreamInfo[];
  remoteTransceiversConfig: TransceiverConfig[];
  sinkId: string;
}
Pass the property to the Participant:
<Participant
  participantId={participantId}
  md={md}
  audioStream={audioStream}
  videoStream={videoStream}
  key={participantId}
  sinkId={props.sinkId}
/>
Toolbar component
We will need a new component to display the Settings component. Open the file
./client/src/Meeting/Toolbar/Toolbar.tsx to implement the following changes:
- Add a new the
onSettingsOpenproperty to the component. - Modify mute audio to choose the right microphone when unmuted.
- Modify mute video to choose the right camera when unmuted.
- Create then a button that will trigger the function
onSettingsOpen.
We start by importing the filterMediaDevices function:
import {filterMediaDevices} from '../../filter-media-devices';
We will add a new property to the Toolbar called onSettingsOpen.
interface ToolbarProps {
  vpaas: Vpaas;
  localStream: MediaStream | undefined;
  onLocalStreamChange: (stream: MediaStream | undefined) => void;
  onSettingsOpen: () => void;
}
Now we change the getUserMedia() request in handlePressMuteAudio to request
exactly the devices that we have selected:
const devices = await navigator.mediaDevices.enumerateDevices();
const filteredDevices = await filterMediaDevices(devices);
const newStream = await navigator.mediaDevices.getUserMedia({
  audio: {
    deviceId: filteredDevices.audioInput?.deviceId,
  },
  video: false,
});
And we do the same in handlePressMuteVideo:
const devices = await navigator.mediaDevices.enumerateDevices();
const filteredDevices = await filterMediaDevices(devices);
const newStream = await navigator.mediaDevices.getUserMedia({
  audio: false,
  video: {
    deviceId: filteredDevices.audioInput?.deviceId,
  },
});
Finally, we render the new button:
<Tooltip text="Change devices">
  <Button
    variant="translucent"
    modifier="square"
    onClick={props.onSettingsOpen}
  >
    <Icon source={IconTypes.IconSettings} />
  </Button>
</Tooltip>
Meeting component
Finally, we will make some modifications to ./client/src/Meeting/Meeting.tsx.
We start by importing the filterMediaDevices function and the Settings
component:
import {filterMediaDevices} from '../filter-media-devices';
import {Settings} from './Settings/Settings';
Then we define the state for sinkId that will store the current deviceId for
the speaker:
const [sinkId, setSinkId] = useState<string>('');
And we define another state for settingsOpen that will indicate if the
settings panel should be visible or not:
const [settingsOpen, setSettingOpen] = useState(false);
Define functions and handlers
Next we will define a function that will detect if there is any active track in an array. If there isn't any active track, we will consider that a stream is muted:
const isAnyTrackActive = (tracks: MediaStreamTrack[] | undefined): boolean => {
  return tracks?.some(track => track.readyState === 'live') ?? false;
};
const getNewLocalStream = async (
  requestAudio: boolean,
  requestVideo: boolean,
): Promise<MediaStream> => {
  const devices = await navigator.mediaDevices.enumerateDevices();
  const filteredDevices = await filterMediaDevices(devices);

  setSinkId(filteredDevices.audioOutput?.deviceId ?? '');

  const newLocalStream = await navigator.mediaDevices.getUserMedia({
    audio: requestAudio
      ? {
          deviceId: filteredDevices.audioInput?.deviceId,
        }
      : false,
    video: requestVideo
      ? {
          deviceId: filteredDevices.videoInput?.deviceId,
        }
      : false,
  });
  return newLocalStream;
};
Another function that we have to define is the one that will be triggered when we push the save button in the settings component.
The function will perform the following tasks:
Change
settingsOpento hide the settings panel.Check if the audio and/or video are muted.
If any of the streams are not muted, we will do the following:
- Get the new
MediaStreamindicating which stream we need (audio and/or video). - Stop all the previous tracks. This way we free the camera and microphone that we were using before.
- Set the
localStream. This way we will see theSelfViewwith the new camera. - Send the new
MediaStreamto VPaaS, so other participants can get our feed with our new camera and microphone.
- Get the new
const handleSaveSettings = async (): Promise<void> => {
  setSettingOpen(false);

  const audioActive = isAnyTrackActive(localStream?.getAudioTracks());
  const videoActive = isAnyTrackActive(localStream?.getVideoTracks());

  if (audioActive || videoActive) {
    const newLocalStream = await getNewLocalStream(audioActive, videoActive);

    localStream?.getTracks().forEach(track => {
      track.stop();
    });

    setLocalStream(newLocalStream);
    vpaas.setStream(newLocalStream);
  }
};
useEffect hook
We should also make a small modification to the useEffect hook. Instead of
using getUserMedia(), we will use the function that we have just defined a few
moments ago, getNewLocalStream(), to request audio and video:
useEffect(() => {
  ...
  const audioActive = true
  const videoActive = true

  const localStream = await getNewLocalStream(audioActive, videoActive)
  ...
}, [])
Render the component
The RemoteParticipants component should receive the sinkId, so we add this
value to its properties:
{remoteParticipantsIds.length > 0 && (
  <RemoteParticipants
    remoteParticipantsIds={remoteParticipantsIds}
    streamsInfo={streamsInfo}
    remoteTransceiversConfig={remoteTransceiversConfig}
    sinkId={sinkId}
  />
)}
Now we define the Settings component that will change receive the callbacks
onCancel and onSave. This component will be visible depending on the
settingsOpen value:
<Settings
  isOpen={settingsOpen}
  onCancel={() => {
    setSettingOpen(false)
  }}
  onSave={() => {
    handleSaveSettings().catch((e) => {
      console.error(e)
    })
  }}
/>
The last step is to define add the onSettingsOpen callback to change the state
of settingsOpen to true:
{mee != null && (
  <Toolbar
    mee={mee}
    localStream={localStream}
    onLocalStreamChange={setLocalStream}
    onSettingsOpen={() => {
      setSettingOpen(true)
    }}
  />
)}
Run the app
If you want to run the application, you will need to launch the server and the client at the same time. We start by launching the server:
$ cd server
$ npm start
And in another terminal we launch the client:
$ cd client
$ npm start
The browser will be opened automatically with the URL https://localhost:4000.
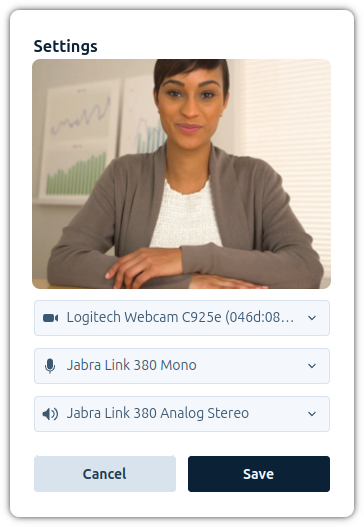
If you click on the settings button during a meeting, you will see the following dialog:
You can compare your code with the solution in Step.05-Solution-Change-devices. You can also check the differences with the previous lesson in the git diff.